Showing posts with label tutorials. Show all posts

Easy Paper Flower Topper Tutorial


It has been a busy and blessed season here and we have a wonderful tutorial from BlossomsAndPosies but before that  here are some eye candy for you of my Christmas gifts I gave this time.I tried to do handmade gifts.A gorgeous white peony and anemone arrangement laced with some succulents. 


A poppy based arrangements this time it is all artificial to match a poppy painting hanging in my uncle's room.Some Hair flowers for cousins..


Head on over to make this simple origami pointsettia gift topper inspired from my new book "How to Make 100 Paper Flowers". BlossomsAndPosies  won the challenge on TotallyTutorials  and created this flowers inspired from the Sunburst in the book!!! With 100 flowers to choose from I am sure you too will designing many new flowers with the book.

Happy Crafting!


Dress up your gift bags or great idea for scrapbookers

A small idea! My daughter wanted to dress up her brown paper bag for her project from school so we put our heads together with all the punches that we had on hand to decor it up.

See what can be achieved with white computer paper,heart punches and a brown paper bag.


Look for  heart punch camellia instructions in my new book.Vary it up with punched out leaves as stamens in the center as in the camellia. You have a new flower under your belt!  Would be great for scrapbooking and adding to a white Xmas handmade cards even. Decor it up!


Look for  the similar heart punch rose instructions in my book!

Fun EasterCrafts - Adhesive Fabric Paper Flowers Tutorial Hairband

An easy fun Easter craft that you could do with your kids at home is this beautiful hairband that we have created.Making this project is a breeze especially with this new discovery called Adhesive Fabric Paper i.e. Fabric with a adhesive on the back.I found this recently and have been smitten by the product.

headband DIY fabric paper flower

DIY fabric flower tutorial


Materials
Pink Floral Adhesive Fabric Paper Stack.  - can be bought in  Joann /Michaels or Walmart

Headband - found in  Joann /Michaels or Walmart
Button -2 to 3 - Joann /Michaels or Walmart
Glue gun
Scissors
A small peice of foam


Step 1. Cut a piece of the fabric paper - an awesome product - into a strip wide enough to cover the headband. Peel of the backing and stick onto the headband.Use 2 pieces or 2 layers if necessary.Fold over and stick the rest onto the back of the headband.Cut next the pink into a 2 inch wide strip and further cut into squares like in picture. Peel of the paper backing of the square and fold over to form triangle as in picture below


Step 2. Fold over the bottom corners of the triangles to form pleats to form petals like shown below.Apply a little glue to stay in place.Create 6-8 petals depending on choice.


Step 3. Glue gun the 6 petals together side by side to form a ring.Dab glue in the center to result in shape below.Glue the foam piece to the center of the button.


Step 4. Cut a square bit from the paper fabric and peel off the backing and cover the button tightly.

Step 6. Cut a tapered strip from the floral paper to cover and stick to back of headband.Dab glue if neccessary.
Step 7. Stick button onto the center of the flower and glue gun flower onto the covered headband.

If you like this post you would love my new book "How to make 100 Paper Flowers"  
Now at Barnes and Nobles and in select craft stores.

For a buying a signed copy click here


Tutorial whimsical paper flowers poppy How to make DIY

paper flowers tutorial

Refer: How to Make 100 Paper Flowers - for Winding Rose and Anemone for the inspiration for this and other detailed techniques.

Materials:
Crepe paper folds - peach/ivory/red/black Blumchen Castle in the Air
Scrap book paper - in red and black pattern or of choice Joann Fabrics Michaels
Stem wire -18 gauge Joann Fabrics Michaels
Guinea feathers - optional
Florist wire -26 gauge
Glue -Tacky

These whimsical paper flowers are a breeze to make once you have learned the basic techniques of paper flowers making precisely the "Winding Technique".

Step1. Cut a red square out of the red crepe paper fold. Scrunch some leftover crepe paper scraps into a ball.Bend the stem wire into a hook (very important which most crafters don't instruct as it reduces slippage) and place the hooked end with the ball and wrap the ball with the square to tie with florist wire to get a balled center.

Refer : How to Make 100 Paper Flowers - Anemone

DIY paper flower tutorial


Step 2. Cut 1 1/2 inch wide black crepe paper and fringe it half way. Wrap center with the fringed paper to tie with wire.

Refer How to Make 100 Paper Flowers Bon Bon Dahlia (one of my favorites in the book)


paper flower tutorial DIY


Step 3. Cut a peice of the cream crepe paper breadthwise.Fold over the strip and cut the top into a gentle curve.Unfold.
Refer How to Make 100 Paper Flowers  Carnation Technique


DIY paper flower tutorial  

 Step4. Wind the petalled strip around the center.

Refer  my new book  How to Make 100 Paper Flowers Carnation for detailed step by step photos for this step.

easy crepe paper flower tutorial 

Step 5. Cut a similar 2 inch  or more wider strip from whisper pink crepe paper and repeat step 3 with it.Unfold the strip and this time Cut each petal one inch into the curved side at the folded edges.Frill each petal and repeat Step 4


Step 5. Cut a petal shape from the scrapbook paper.Wrap tape onto a stem wire and stick onto the back on the petal to form leaf. Refer How to Make 100 Paper Flowers


Step6. If you want to add guinea feathers.  wrap the balled center with the feathers and tie with stem wire before adding the fringed stamen for form the variation flower below.


Did you like this tutorial ? - leave me a comment on what flower you would like to see in the next paper flowers tutorial.

Use the pin button to pin the tutorial to your pinterest board to file it away and  come back to this page when needed!

If you like this you would love my book on Amazon "How to make 100 Paper Flowers"
Now at Barnes and Nobles and  and soon in craft stores.

For a buying a signed copy click here


Be sure to pin these to refer back!!!

a Rafflecopter giveaway

Wreath Tutorial a diversion from paper flowers !

A gorgeous wreath tutorial that can be made with no messes!
Quite a diversion from my paper flowers.Using just a few leftover ribbons you can recreate this wreath at home.Change colors to suit the season,best of all NO gluing!

Season 1 Winter - A Peace Wreath.


I hate cutting ribbon and using glue..I LOVE to reuse my ribbons and the wreath form so it was quite a challenge to get some beautiful without cutting and pasting:-)

My aim was to use what was on hand some ribbon leftovers and the foam wreath.No buying anything.I wanted to use NO Glue as I want to reuse the wreath base again to transform it according to the New England seasons :-) Each season I am going to transform the same base to something new.I love challenges :-)


Materials needed:
1.Wreath form base
2.Pins
3.Left over ribbons
4.Peace Sign (mine is a ornament made by my kindergarden son at school :-))


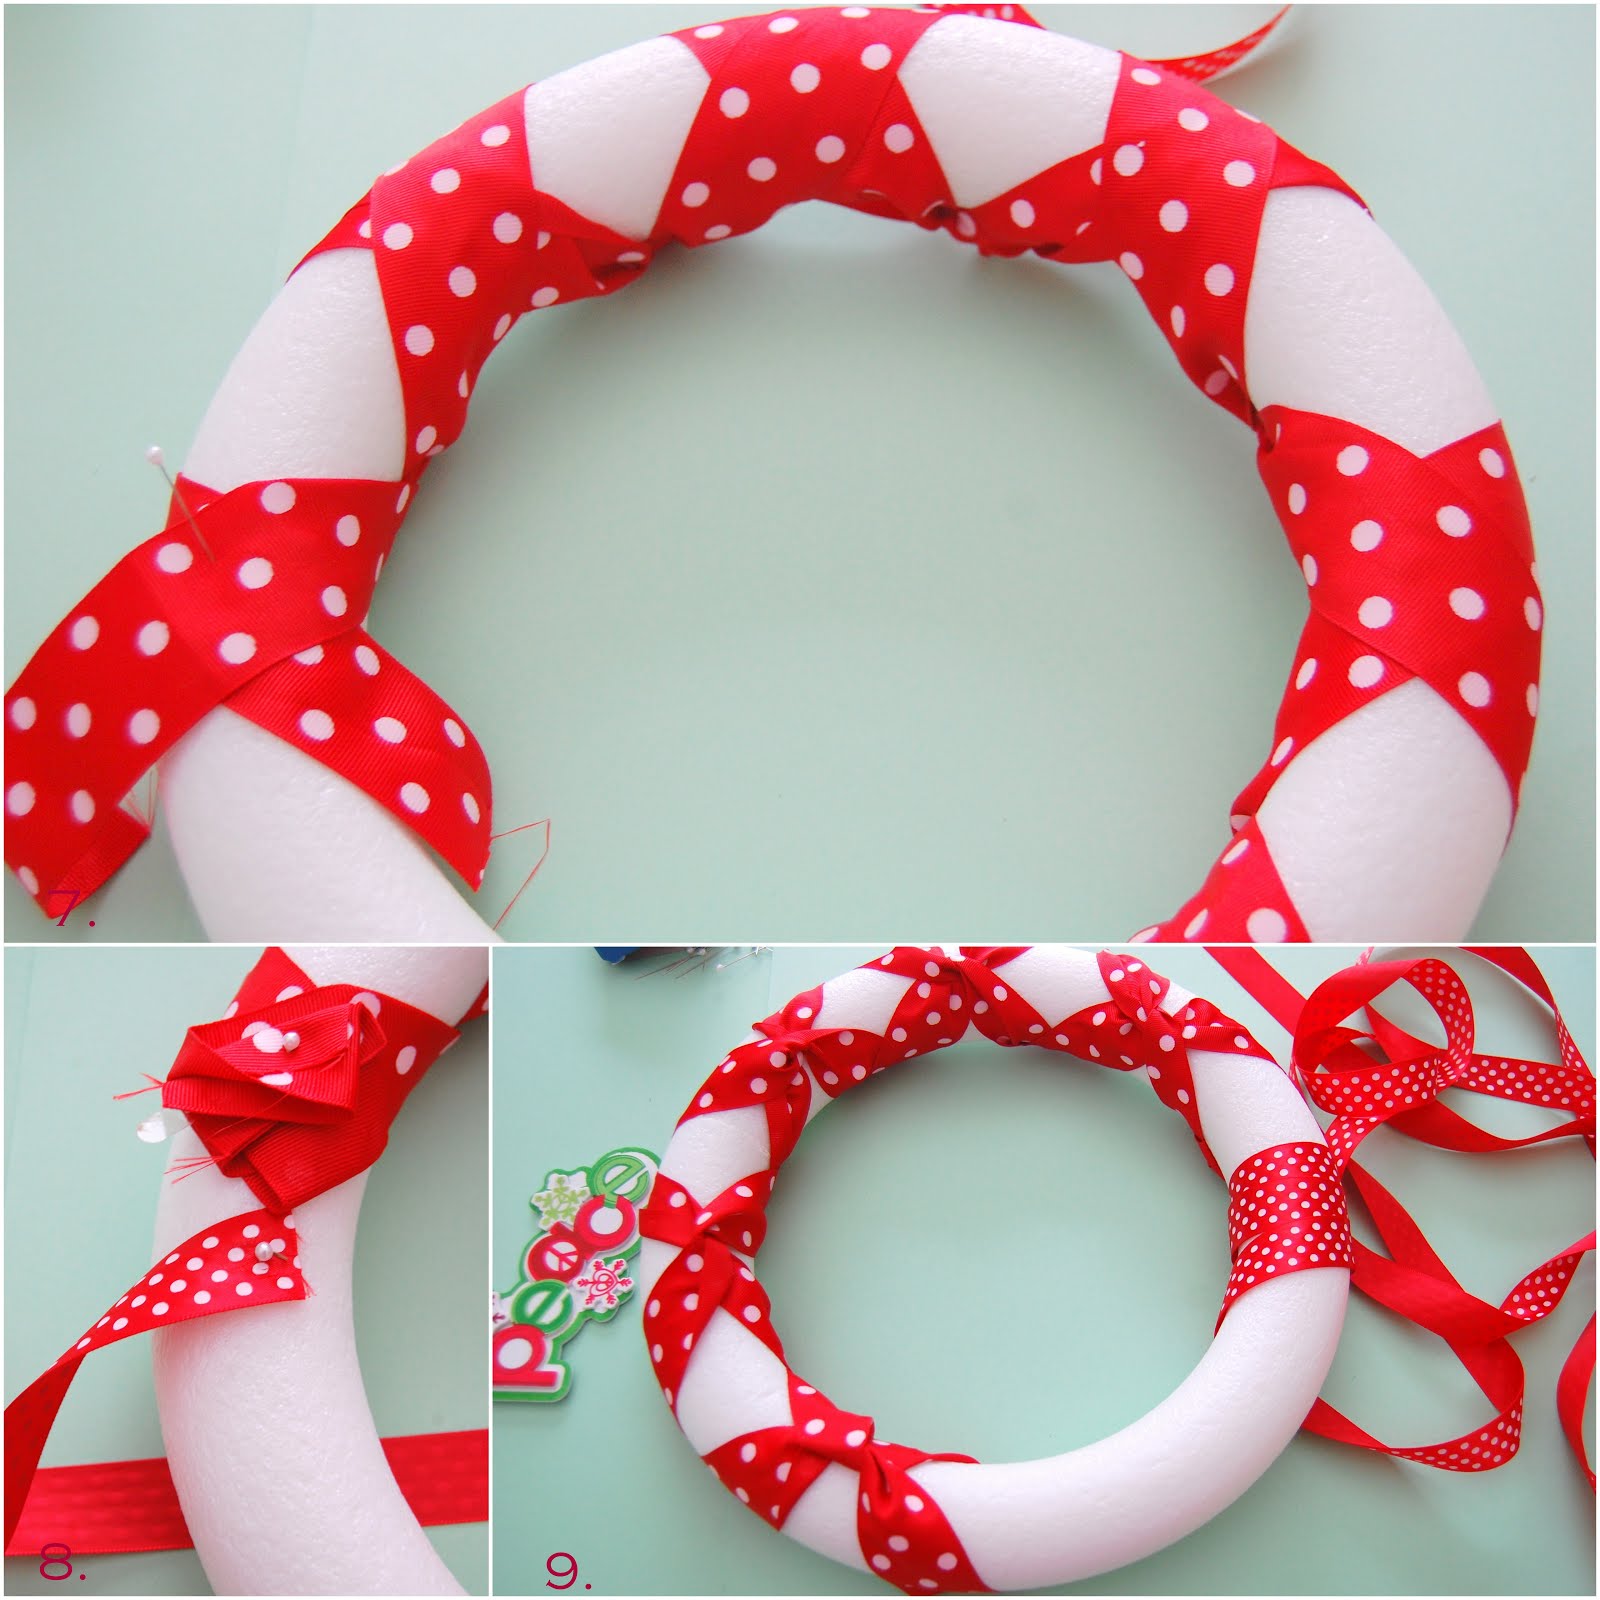
2.Take the widest ribbon and fold the ribbon into equal half.Pin the center onto the wreath base.(no glue:-) of course if you want to use glue go ahead:-))
3.Turn over the wreath base and bring up both ends of ribbon to cross over each other.


4.Cross over the ribbons again as in step 4 to form a knotted design.
5.Take ends to the back of the wreath and cross over at the back to bring up again.
6.Repeat again to cover till your finish 3/4 of the wreath.


7. Step seven shows how your back will look like once done.
8. I hate trimming ribbon.:-) So I folded over the rest (there was not much left as it was a left over bit) and pinned it to the back.


10. Pin the next ribbon end onto the back of the form.Keep wrapping till you finish the wreath.Secure the end with a pin again making sure all pins are at the back.
11.Thread a pin through the back of the peace sign and secure the pin in the wreath base tilted to one side.

You are done.Time taken less than 10 minutes,cost zero.

Wreath forms can be found at www.michaels.com or acmoores.com or any craft stores.
Ribbons used are from Michaels craft store www.michaels.com
It you like this do share it using the Share Button.

ShareThis

 
Pin It button on image hover